Monday, May 3, 2010

Cashew Salad

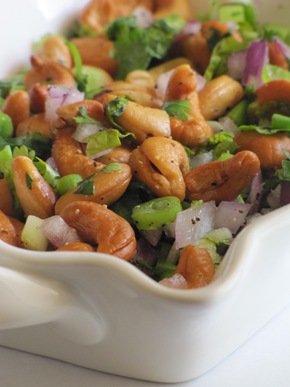
You think cashews are good? Try cashews with fresh lime dressing and fresh herbs. You will love it!

Cashew salad is a common snack in Thai cuisine. Often tossed with simple dressing and fresh herbs, this can be a great accompaniment with a lighter meal at a party. Believe me, the guests would love it. This simple salad just with a glass of freshly squeezed lemonade would be a refreshing and filling snack for May days.

It's often misconceived that cashews are rich in fat. The fact being, they are, but on a good side. Cashew nuts are rich in mono-saturated fat, and these fat helps in burning the bad cholesterol. More info here. If you don't prefer roasting with oil, roast the nuts in the oven (of-course without oil) for more healthier version. 
 IMG_2375

Adapted the recipe from the book Savoring soups and salads.

1/2 cup raw whole cashews
1tbsp finely chopped red onion
1 green(spring) onion, including the tender green top, thinly sliced
1 tbsp chopped cilantro or parsley
1 tbsp chopped mint
Salt and pepper to taste
For Dressing,
1 tbsp fresh lime juice
1/4 tsp sugar
1 tsp fish sauce or soy sauce
  
IMG_2373In a heavy wok, pour the oil and place over medium heat. When the oil is hot, add the cashews and keep frying until golden brown.
 
Remove with a slotted spoon and transfer to a paper towel to drain the excess oil.

If you prefer, you can toast the cashews in oven preheated at 325F for 5-10 minutes.

Place the warm cashews in a bowl, add the onions, mint, parsley and toss well.

To make the dressing, in a small bowl, combine the lime juice, soy sauce and sugar and mix until the sugar dissolves. Pour the dressing over the salad and mix well.

Garnish with more Cilantro if preferred and serve immediately.

Thursday, April 29, 2010

Unusually Usual – Jollof Rice

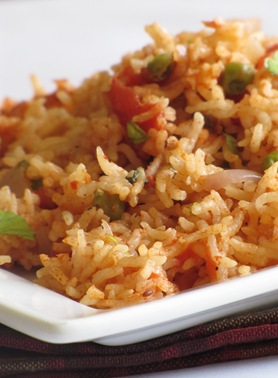
Don’t be intimated by the name; it’s just our usual tomato rice with an unusual name; cooked usually with a bit of unusual ingredients. Unusual ingredient sounds a bit of exaggeration. Carrots and peas and chicken don’t sound unusual to me, you may ask? Oh! Dear. They do, they do sound unusual in tomato rice. [At least for me]

So, when I sighted upon PJ’s African cooking event and her jollof rice, I knew my blog space was craving for it, quite some time now. [After all, we thrive on the same recipes]. Along with the basic ingredients (of course, rice and tomato), you add nearly any kind of meat, vegetable or spice. There you go. You can call it ‘Jollof rice’ instead of our usual boring ‘Tomato rice’.

Ok. I know. It’s bad. Let’s not compare. Jollof meaning ‘one pot’ is a common dish in west-africa, especially Nigeria. Spices, and sometimes curry powder are added to the rice to give it a unique color and flavor. Healthy, simple and delicious are the terms I can relate to this captivating one-pot rice dish.
  IMG_2322
 
[Recipe adapted from What's for eats]
2 tbsp Oil
1 tsp Cumin seeds
1 tbsp Curry powder
1/2 tsp red chili powder
1/2 tsp paprika
1/2 tsp cayenne pepper
2 Onions, sliced thinly
2 Cloves Garlic chopped
2 Cups Water
1 Cup Basmati Rice [Washed and soaked for 15 minutes]
2 tbsp Tomato paste
1 can diced or whole tomatoes
1/2 cup Mixed Vegetables[Carrot, peas, beans, Cabbage]
1/2 cup Chicken pieces cubed[Optional].
Salt and pepper to taste 
 
IMG_2345
In a wide pan(make sure, its got a tight lid), heat oil, add the cumin seeds, garlic and the masala powders. Fry for a minute. Add the onions and fry till the raw smell goes.

Add the tomato paste, along with the crushed tomatoes and cook for few minutes.
Stir in the vegetables and Chicken if using. Season to taste.

Add water and bring it to boil. Add the basmati rice, and check for salt and spice. Reduce the flame to low, cover tightly and cook for 40 minutes or until the rice is cooked and the moisture evaporated.
Switch off.Keep the lid closed for another 15 minutes. Serve.

If using a pressure cooker or rice cooker, transfer the contents after adding the basmati rice, and cook accordingly.
 
Note:  I used only peas, just for a lighter meal.
 
As you know, sending this recipe to AWED event started by Divya and hosted by Seduce Your Tastebuds

Sunday, April 25, 2010

The stars shine down

‘In the deep woods, there was a lonely castle… stood a fair maid amidst the dark, starring at the shining stars…’, as the story continued,

I leaned forward, to grab the first handful of rice, that rested peacefully in my grandmother’s hands, not being touched by my grandfather’s story. I took an indulging and caressing look, I reached out closer, with my eyes and ears on the shining stars, and as I was about to savor it— it vanished. Someone took it. And this time the culprit was my brother. I demanded, next is for me! No, it’s for me -this time it’s my other three sisters. No I— . I am the elder one, and I should be more patient -that’s my grandma. OK. OK. I will wait!

Amidst the splendor and festivity of days, we sometimes have days, rather, nights like this. In the not-much deep woods, there was a lonely castle, and this time—Five of us stood, demanding for more stories and more food, in an open terrain under the starry sky, with few light-flies glittering around us. Our grandparents live in a beautiful village house, surrounded with land full of trees, crops and weeds, as far as we could see. The neighbor next door, we have to walk a mile or two. During holidays and festival times, we— my and my cousin’s family gather to celebrate the season together. The adults will be busy cooking or preparing for the festival.

And for us, it’s a different story. The days were spent wandering through the lands with our grandpa, watching him water the crops, playing in the water, peeping in to the well and much more. As slowly, the sun sets in the horizon, and the little stars twinkle in the sky, our nights would come to a standstill. Each of us have our own bed— rather I should say, a cot made just with the ropes. And we lay them one after other in the open roof outside the house.
IMG_2267


Each dinner night, our grandmother brings a big vessel filled with enough rice and the simmered pot of a lavishing eggplant curry, she made earlier in the day. The aromatic smell from that curry arouses all our senses. She makes a big ball of them, and keeps on her hand, just for us to grab and savor it. Nothing tasted much better than that. A love affair, that happened then, will never leave our hearts for the rest of the days to come, and will never compare to the rest of the foods we eat.

The curry was fabulous, and the stories were thoughtful, and the skies were bright. It seemed the stars were listening, as they shined down to nod; and the birds echoed with our grandfather at the end of his each statement.

Days and nights were beautiful and it was meant to be— till life took over;

'Life would be the same forever, with the same food, same love, and same moon, as long as the stars shine down', I thought.

The gods were laughing! And I didn’t hear them do.

Not that I am complaining now. It’s just, the remains of the past are nothing, but dreams happened in real.

Though a part of me long’s for those days, but,

Yet the stars shine down, I still make the curry, I still have the hope of feeding my children, I still believe the moon follows us where ever we go. And still, I vaguely remember the stories to tell them, how the stars shine down.

I’m glad; I can share the story and the curry—

The gods must be smiling!

IMG_23073/4 cup Green Moongdal whole [dry roasted and soaked overnight]
2 Tomatoes
1 large red onion
2 red chili or more as per taste
2 medium size Eggplants/Brinjal [Optional]
1/4 tsp Mustard Seeds
2 or 3 Curry Leaves
2 tbsp Curry Powder or Sambhar powder
1 tsp Coriander powder
1/4 tsp Cumin powder
1 tsp red chili powder[Use only if more you need the dish to be more spicy]
Coriander leaves to garnish
1 tbsp Oil

Pressure cook the moongdal with enough water. Preserve the water and the cooked moongdal.

Blanch one tomato i.e. place the tomato in a vessel and cover with enough water. Boil the water for about 15-20 minutes, till the skin tomato becomes tender and easily peel able. Once done, discard the skin and mash the tomato.

In a heavy bottomed pan, heat oil, add mustard seeds, red chilies and curry leaves and let them splutter. Add the onions and fry till the onion turn slightly brown.

Add the blanched tomato along with the chopped tomato and all spice powders. Fry for 2 to 3 minutes, till the tomato is soft and mixed well with the gravy. If adding Eggplants, add now, simmer, cover and cook for 20 minutes till the eggplants are tender.

Add the cooked moongdal with the preserved water, adjust the water according to your preference of the curry thickness, however a slight this consistency would be tastier. Bring to boil and simmer for 15 minutes. Garnish with coriander leaves and serve with rice or roti.

Sending this recipe to Jo's Mother's Day Event.

Tuesday, April 20, 2010

Same Difference

One look at the ingredients, I hear you say, Oh! wait. I know this, I too have a similar recipe. Yes, these are the same old puff pastries you have in your space. Believe me, it’s mostly the same ingredients. Only the looks maketh a difference! Looks are deceptive, aren’t they?

What would I do? Cold and cough. I wasn’t quite well for a couple of days. And, my dear husband took the responsibility to, well, you know, to put all the food restrictions! No sweets and no snacks. Now, that I am fully recovered. I keenly took the responsibility to make these crossovers. I really started to make a berry crossover, but instead, I ended up making these spicy egg-onion crossovers.

What a delightful tea-time snack? Really, does it matter? A plain folded puffs or solely criss-crossed puffs. It’s just the same with difference. But this small difference would make a difference, won’t they?
 IMG_2262 
1 sheet puff pastry thawed
2 large eggs [or] 1 cup Mixed vegetables[Potato, Carrot and Peas]
1 medium red onion thinly sliced
2 tbsp tomato puree
1 tsp red chili powder
1 tsp pav bhaji masala
1/4 tsp chat masala
1 tsp coriander powder
1/4 tsp mustard seeds(Optional)
2-3 curry leaves(Optional)
a few coriander leaves chopped
1 Egg white beaten for egg wash[Optional]
2 tsp oil
Salt and pepper

For Egg puffs, boil the eggs, shell them and chop them roughly. Set aside.

In a hot pan, add oil, splutter the mustard seeds, add curry leaves and onions and fry till the onions are browned. Add the tomato puree along with the masalas and fry for another 2 minutes.Set aside.

Note: For vegetable puffs, add the vegetable to the onions, cover and cook over a low flame for about 5-10 minutes, till the vegetables are tender. Remove the cover and fry for 2 to 3 minutes over medium-high heat. Use this for topping instead of eggs.

Cut the puff pastry sheet to form a long rectangle shape. Line a baking sheet with parchment paper and dust with some flour. Place the pastry in the baking tray.

Clipboard1
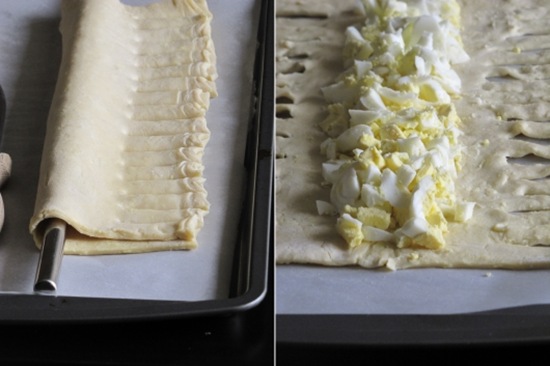
Place a rod/dowel in the center of the puff pastry and fold them. If the dough is too sticky, sprinkle with flour.
Clipboard2
Cut the edges into 1/4 inch strips running the knife. Make sure not to apply pressure on dough, so they won't tend to stick together. Unfold the dough carefully and remove the rod.

Place the chopped eggs diagonally in the center. Sprinkle with salt and pepper. Top it with the onion mixture.
 

Clipboard3
Now, fold the strips inside alternatively from two sides, one over the other. Make sure they are crossed one over the other and are sealed completely. Cross the strips till the end of the dough! No need to seal the edges. Once done, give it an egg wash.

Egg Puffs
Bake in a preheated oven at 375 degree F for about 30 to 40 minutes, or until the edges are golden brown. Cut into long puffs and enjoy!

Friday, April 9, 2010

Edible Bowl

It’s incredible how we cook frantically at times, to fix a quick dinner or a short lunch. But often times, we crave for a delicious meal, slow cooked and simmered to perfection, with an enormous touch of seasoning. I suppose in those days, women spend most of their time in their kitchen, relaxing and taking their own time to cook. And I suppose that’s one of the best workouts, which keeps them fit all through.

Today often we eat out at work, microwave some pre-cooked foods or worse, grab a burger from a fast-food restaurant. Not really knowing (or rather caring) what's good and what's not. I suppose this is mostly the daily happenings with working women.

But, for all those days of fast-food, for all those days of eat-outs, for all those days of unhealthy-meals,
here is something with a difference. Inspired and adapted from Panera Bread’s soup in a bread bowl, dear friendly friends, I present you, savored and sweltered onion soup in an incr(edible) bowl.
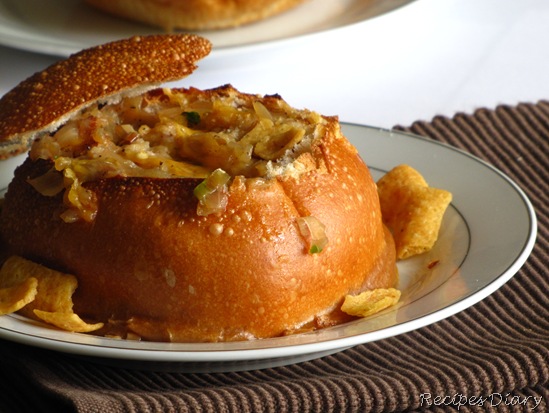
IMG_2168

SOUP IN A BREAD BOWL
[Serves 2]

  • 2 medium Onions- thinly sliced
  • 1 cup vegetable stock
  • 1/2 cup beef or chicken broth[Optional]. Use 1/2 cup Vegetable stock instead.
  • a small piece of ginger
  • salt and pepper to taste
  • 2 firm round bread loaf/preferably sour dough bread.
  • 1 tbsp butter
  • 1 tsp oil or more
  • 1 tbsp shredded cheese(Optional)

Slice the bread at the top, just to make a slight opening at the top. Scrape out the soft bread carefully from inside the loaf. It should look like a hollow bowl. Place the bread bowl under broiler for 1 minutes(or less), just to harden the surface. This is done to avoid the bread from absorbing the liquid from the soup.

In wide pan, heat the butter and oil over medium heat. Add the onions and leave it to cook till tender[do not stir in between]. Once tender or lightly browned, fry the onions over medium heat, till they become nicely browned(dark golden brown).

Add the vegetable stock and beef or chicken broth if using, along with the ginger and bring to boil, reduce and simmer for 20 minutes. Mix in the chopped cilantro.

Spoon in the soup into the bread bowl, and top it with cheese if using and broil for just 30 seconds or until the cheese is melted. Serve immediately with corn or tortilla chips.

Tuesday, April 6, 2010

Savoring Curry

So, there I stood. Right in the kitchen. I hesitantly took a peep at my pantry. One fat onion was boldly starring at me. And that's it. No tomatoes. No Eggs. No Greens. May be a few leftover vegetables. What could be much worse than your pantry missing few important ingredients, especially tomatoes, especially when your friend is joining you for lunch?

And what could be better than calling mom and asking for suggestions? And what else could be better than the simple mix matches she gives? And so, there I stood. Right in the kitchen. I hesitantly mix matched the ingredients. I was boldly looking at the simply, but enormously savored vegetable curry.

IMG_2162 

VEGETABLE CURRY/KURMA

For Grinding

  • 1 small stick Cinnamon
  • 2 Cloves
  • 1 Cardamom
  • 1/2 tsp poppy seeds
  • 1/2 tsp fennel seeds
  • 1 small green chili
  • 1/2 cup Coconut grated or more
  • 1 tbsp Pottukadalai (Split Roast gram dhal)

Grind the above ingredients to smooth paste adding little water or more as required.

For the Kurma

  • 1/4 tsp Mustard Seeds
  • Curry leaves: 3 or 4.
  • 2 tsp Ginger Garlic paste
  • 1 tbsp coriander powder
  • 1/2 tsp Cumin powder
  • 1 tsp Garam Masala
  • Onion-1(finely chopped)
  • 1 cup Mixed Vegetables [I used 1-Potato ,1- Carrot, and more Beans]
  • Water as required
  • Coriander leaves (for garnishing)

In a hot pan, add oil, mustard seeds, curry leaves and onions and fry till golden brown. Add the ginger garlic paste and fry till the raw smell goes.

Add the vegetables, salt, coriander powder, cumin powder, simmer, cover and cook until the vegetables are done.
 
Add the grinded mixture along with water and bring to boil for about 10-15  minutes. Switch off. Garnish with Coriander leaves.[Which my pantry was missing this time:( ]

Can go well with rice, chapathi, or as a soup by itself.

P.S And my friend loved it a lot, so much that she took the left over with her- sparing me the empty vessel :(

Sending this recipe to Cooking with Seed-Cardamom event hosted by Priya's Easy N Tasty Recipes.

Monday, March 29, 2010

Wandering Memories

Somewhere in the middle of shaping the candies, I looked down at my fingers. I Just looked. I hear you say, so what? doesn't everyone look at their fingers...or actually hands? Yes. Well, okay. But, not everyone have memories attached to it, well..maybe or maybe not, as I do.

There we [my sister, brother & me] were, standing near the kitchen door wanting,..no waiting...no watching. Wait,..yes definitely its 'watching' this time - watching  our mom's tender fingers wandering in the coarse, stickier, nuttier peanuts, well you get the point. She tries to shape them into perfect round candies. For some reason, our cravings for these soft, sticky candies becomes harder,  ignoring her little efforts.

Do you think we waited for our mom to shape them? Yes, No..I mean No. Cravings overcoming patience! And you know what happens. Grab a handful. Indulge in happily. Ignore mom's little angry face. Such a fragrant and delectable fellas you see. Couldn't stop eating them - then and even now. But, I do have the patience now, to shape them - just to complete my mom's work. Sweet isn't it?

IMG_1923 

PEANUT CANDY/KADALAI URUNDAI

  • 1 cup Peanuts
  • 1 tbsp packed jaggery[Use a mortar pestle to powder the jaggery]
[Recipe makes 8 medium sized round candies]
Dry roast the peanuts over medium-heat till lightly browned. Cool and remove the skin.

Grind the peanuts and the jaggery together in a mixi, till they form a slightly coarse mixture. Transfer and shape them into round-shaped candies.

To be noted: Do not grind it to very fine or a more coarse texture, somewhere in between coarse and fine should do. I dusted my candies with little grounded peanuts-just for photograph.

IMG_1981

Friday, March 19, 2010

Spread a little Avocado

Sometimes life feels like more of co-ok-ing. Breakfast and lunch and dinner and snacks and finally cleaning up the mess. Everything just inside the kitchen. That completes the active part of our daily life. But do we get exhausted and tired? No, we don't. Luckily there are feelings -accomplished and satisfied to the rescue.

We spread a little love on everything that comes out from our kitchen. But wait, what about the dull and cranky mornings? Pour a bowl of cereal or spread a little butter on a steamy toast! cereal - boring, bread and butter - not again, please.

What else can go on a breakfast toast? why not spread a little super-fast, healthy and delicious 'Spread'...and spread with warm feelings? I am not talking about Philly here. Well, you will see!
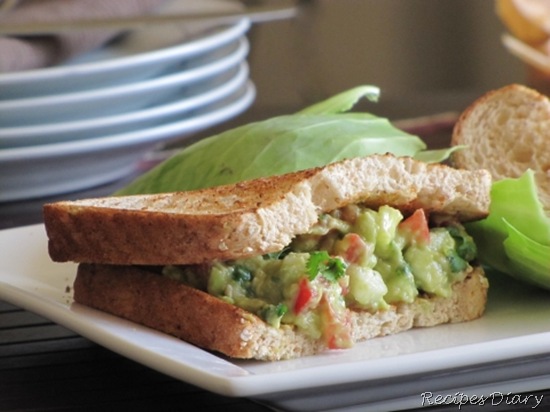
IMG_1786 

AVOCADO SPREAD

  • 2 ripe Avocado scooped and mashed.
  • 3/4 cup cucumber chopped to 1/4 inch size or smaller [skin peeled]
  • 1 medium onion chopped finely
  • 1 large tomato de-seeded and chopped
  • Juice from 1/2 lemon
  • Cayenne pepper 1/4 tsp or less(Optional)
  • Salt to taste
  • Pepper to taste

Mix everything in a bowl and spread them over a nicely toasted bread. Can use 1/2 inch cut French bread or Italian bread slices.

Sending this recipe to Weekend Herb Blogging #225 event hosted by Health Nut. Also, sending the recipe to Think Beyond the Usual - Fruits hosted by Nithu of Nithu's Kitchen.

Saturday, March 13, 2010

'Tis the reason to be Inspired

For me, inspirations comes in all forms. Looking at a beautiful picture-I get inspired to paint. Looking at the 'seconds' needle- I get inspired to keep trying. Looking at a tempting food- huh, lets see. Do I get inspired to cook? gosh no, with no second thoughts, I would dig in right away.

But, I do get inspired to cook-looking at a tempting food picture. And that is what I did when Madhur Jaffrey talk about the delicious and healthy Moongdal Chilla in her cookbook. I liked her idea of adding lightly mashed peas to the dosa-which gave a vibrant look to the dosa. Yellow and green!

Have you read her book? I was enchanted at the start, with her perfectly pictured spoon of fresh garam masala and the reason for making them fresh, to a wide range of Indian dishes with healthier options, and finally her question in blissful ignorance-And, to end, would you care for a paan? oh.. I would, definitely!

IMG_1722 

MOONGDAL DOSA/CHILLA WITH PEAS
[in Andhra its called as Pesaratu]

  • 3/4 cup Yellow Moongdal
  • 1/4 cup Frozen Green Peas
  • 1/4 cup Idli rice [can substitute with any short grain rice]
  • 1/2 tsp grated Ginger
  • 1 Red Chili
  • 1/8 tsp Baking soda(Optional)
  • 1/4 tsp Turmeric
  • 1/2 Onion minched or very finely chopped
  • Coriander leaves - 2 tbsp chopped finely
  • Oil for frying
  • Salt to taste

Soak the moongdal in water for overnight or for at-least 4-5 hours, and grind adding little water to make a dosa batter.

Cook the green peas for 5-10 minutes and slightly mash it with your finger. Add the green peas, onion, salt, turmeric, baking soda and coriander leaves to the dosa batter.

Make dosas slightly thinner, than the normal dosa, to cook it evenly. And make sure to add 1/4 tsp of oil or more at the edges of dosa while cooking.

And, to end, would you care for some more interesting moongdal dosa recipes? Here are other reasons to be inspired-

Gita's Kitchen
Or rather should I say Healthy Kitchen? In her kitchen, she inspires us by making moongdal dosa with brown rice. Weight watchers, you might want to keep a close tab on her blog! Almost all her recipes are health-friendly.

Priya's Easy N Tasty recipes
Substituting rice with Oats in otherwise normal moongdal dosa-gives us an insight about her touch of creativity! With wide variety of innovative dishes from all around the world, her space is definitely one of the essential bookmark in everyone's kitchen.

Simple Indian Food
Gives us a traditional and an authentic pesaratu! A blog with almost all Indian recipes you would look out for. You name it, and she has it. Not just recipes, her blog is also a path to- hundreds of active Indian food bloggers through her blogger series.

Monday, March 8, 2010

Dedication with Love

Opening a blog to the sight of a delectable dish, with pleasurable and inspiring photograph, is definitely one of the pleasant blogging experience. With it, comes the passion for cooking and the reason for indulging in food photography.

Those simple thoughts of innovation and touches of creativity, brings an utterly incompetent dish out from your kitchen to others. And that, truly is reward-able.

This post 'Dedication with Love' comes with the feel-good love for all my lovely readers, on this special day. Dedicating this sweet treat to all the lovely bloggers, who unknowingly by their endless efforts inspired and encouraged many others to cook including me! So, herez wishing you all a very Happy Woman's Day!

IMG_1652
 CARAMEL CHOCOLATE SHORTBREAD BARS
Adapted the recipe from food network.
 
Shortbread

  • 4tbsp Sugar
  • 1 1/2 cups All purpose flour
  • 1 1/2 stick or 3/4 cup Unsalted Butter
  • 1/4 tsp Pure Vanilla Extract
  • 1/8 tsp Salt

Preheat the oven to 350 degrees F and place the rack in the center of the oven to avoid burning the shortbread.

Line the baking dish with parchment paper or grease with butter.

Cream the butter with Sugar, add the vanilla extract and mix well, add the salt and flour and mix using a hand or electric mixer for few minutes until everything is well mixed and forms a soft dough.

Press the dough onto the baking dish to about 1/4 inch thickness and bake for about 15-20 minutes depending on your oven, till its slightly brown on the edges. Remove and cool.

Caramel Layer

  • 1 can(13.9 OZ) can Nestle or another Dulce de Leche(Sweetened Condensed Milk)

Transfer the caramel to a microwave bowl and warm for about 2-3 minutes and spread evenly over the shortbread and leave it to set for about 20 minutes.

Chocolate Layer

  • 1/2 cup Semisweet Chocolate chips or any good quality chocolate - chopped
  • 1 tsp unsalted Butter

Melt the chocolate along with butter in a bowl, placed over a simmering pan of hot water, and let the chocolate melt. Once melted pour over the caramel layer and leave it to set for 10-15 minutes.

Cut with the sharp knife into equal squares, store in an air-tight container & refrigerate and definitely Enjoy!

Sending this recipe to Bake-Off event.
Sunday, March 7, 2010

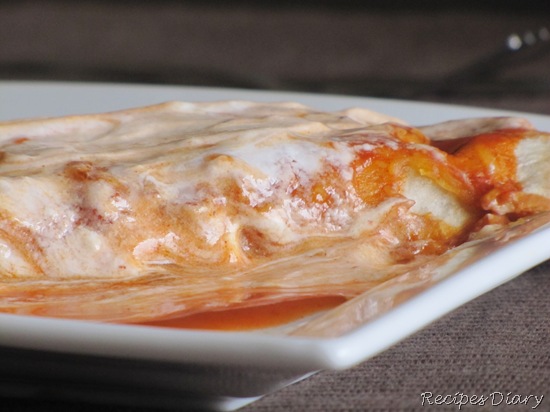
Mexican Spice Trail

Well, its been a week now, and things are getting back on track. A much-needed and a relaxing trip to my sister's place, made my February days shorter and sweeter! Though I didn't find time to blog, I did manage to bring home, a few exotic choice of recipes from my sister's kitchen like this cumin-flavored Enchiladas.

Living and dining in Texas, I shouldn't be blogging about the not-far exotic Mexican foods. With the flavors of Indian spices blended in spicy and bland tortillas, I couldn't stop, but rather let the Enchiladas to brighten up my blog-space.
 
Though making re-fried bean paste and enchilada sauce at home is not much of a work, I used store-bought Old El Paso brand re-fried beans and Enchilada Sauce for a quicker meal.
 
IMG_1612 
BEAN ENCHILADAS
  • Enchilada Sauce - 1 10 OZ can [You can buy hot, medium or mild sauce as per taste]
  • Re-fried Beans - 3/4 cup
  • Sour Cream - 3 to 5 tbsp
  • Cud - 3 to 5 tbsp
  • Cabbage - 2 cups shredded
  • Capsicum - 1/4 cup Chopped
  • Cumin Seeds - 2 tsp
  • Onion - 1 medium sized chopped
  • Garam Masala - 1 tsp
  • Coriander powder - 1 tsp
  • Flour Tortillas - 4 medium sized
  • Water - 2 tbsp
  • Salt
  • Any Cheese - 1/2 cup shredded or more (Optional)
Bean Paste
In a Sauce pan, heat oil, splutter 1 tsp of the cumin seeds, add onions and fry till brown. Add the bean paste along with water, coriander powder, 1 tsp salt and stir over medium heat for 2-3 minutes. Switch off, sprinkle with garam masala and set aside.

Cabbage Stuffing
In another pan, add oil, splutter the 1 tsp of cumin seeds, add the cabbage and capsicum and fry over medium heat for 3-4 minutes. Do not cook the cabbage completely. It should be little crispier. Set aside.
 
Clipboard
Sauce
Add 1/4 tsp of salt to the Enchilada Sauce and microwave for 1 minute and set aside. If using mild or medium spicy sauce you can add chili powder if preferred.
 
Pan fry the whole tortilla over a medium heat, till they are lightly crispier.

Place the tortilla on a serving plate. Pour about 2tbsp of the Enchilada sauce over the each tortilla and spread.

Spoon in the re-fried bean paste diagonally. Spoon in the cabbage over the bean-paste, covering the bean-paste completely. Don't be bothered, if it gets spilled over the tortillas.

Spoon in the sour cream and sprinkle with cheese. Fold from both the edges and flip them over.

Pour about 2 to 3 tbsp of enchilada sauce over the tortilla to cover it entirely.

Microwaving
Top the tortilla with cheese and sour cream and microwave for just 1 minute. Remove from the oven and top it with 2tbsp of curd. Lightly mix up the sour cream, the enchilada sauce and the curd just before serving.
 
Clipboard
Baking
Place the stuffed tortillas in the baking dish with seam side up, add cheese and the 3/4 cup of enchilada sauce over the tortilla and bake in a pre-heated oven at 375F for about 20 minutes or until the cheese melts. Remove from the oven, top it with sour cream and curd, mix them lightly and serve immediately.

Also sending this recipe to Global Kadai - Burritos and Wraps event started by Cilantro and hosted by Dil Se.

Monday, February 8, 2010

'Simplicity' is the key Ingredient

Sometimes, we crave for delicious, home-cooked, complete and a filling meal, like the simmering pot of chicken curry from our grandma's kitchen. But there are times, when we want simple and 'on the go' breakfast. As simple as bread, butter and sugar! Here is one such recipe. Bake the pancake and toss in few vegetables and there you go, healthy and a simple breakfast.

IMG_1470 
BAKED VEGETABLE PANCAKES
Recipe Courtesy : tasteofhome magazine.

For the Pancake
All purpose flour - 1 cup
Eggs - 1 beaten
Milk - 1/2 cup
Baking Powder - 1/4 tsp
Baking Soda - 1/4 tsp
Butter - 1tsp
Salt - 1/4tsp

Or, for a quicker breakfast, use a store bought Bisquick Pancake mix!

For the Topping
You can use any vegetables you prefer, but here is what I used.

Broccoli florets - 1/2 cup
Green Bell Pepper - 1/4 cup
Onions - 1 Sliced lengthwise
Tomato - 1 Chopped
Mushroom - 1/4 cup (Optional)
Frozen Corns - 1 tbsp
Jalapenos - 1 tsp Chopped (Optional)
Carrot and peas - 1/2 cup
Salt- 1/2tsp
Oil - 1 tsp
Ground Pepper or Chili Powder - 1 tsp
Cheese - Shredded 1/2 Cup (Mozzarella or Cheddar)

Place the un-melted butter in a pie-pan, and place it in the oven, pre-heated at 450°F, and heat until the butter is melted.Carefully, tilt the butter to coat the pan.

In a separate bowl, mix the ingredients for the pancake until smooth. Pour into the pie-pan and bake for 12-16 minutes or until brown.

While the pancake is baking, heat oil in a skillet, add the onion and fry for few minutes, add the vegetables and fry for few minutes in a high flame, till tender and crisp. Add salt and chili powder.

P.S.Cooking the vegetables can be skipped, if you prefer raw-vegetables.

Once the pancake is done, remove the pan carefully, sprinkle the cheese and top it with the cooked vegetables. Return the pie-pan to the oven and bake for another few 3-5 minutes, or until the cheese is melted.

P.S. Instead of vegetables, you can top it with berries, powdered sugar and whipped topping for a sweet treat!

IMG_1484 

Sending this recipe to Sunday Snacks-Healthy Snacks event, Jihva for Ingredients event hosted as Jhiva-Breakfast event.  Sending the photo to the DMBLGIT event hosted by Susan of the The well seasoned cook

Thursday, February 4, 2010

From Mom's Kitchen

Gone are those days
Memories remain, close in many ways
Cooking and Photographing, tired she lays
Thinking about, Mom's salad days!


Got too emotional, I guess..never mind! My favorite evening-munch. Coming back from school, I would right-away indulge in the salad, never bothering to change my uniforms. Its the 'only' healthy food I loved those days:).
Coming to the recipe, I always prefer my mom's way, with no optional ingredients listed. But you can always try adding some onions & tomatoes, and I guess the kids would love it with fresh grated coconut.
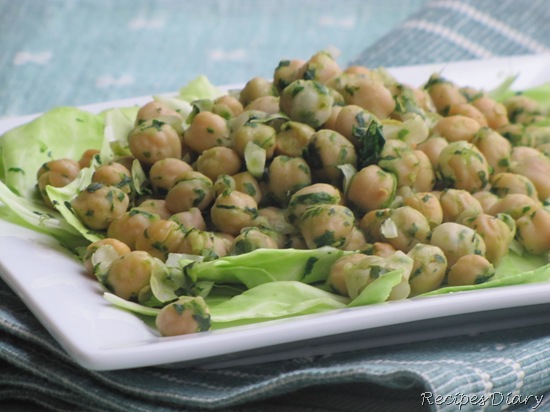
IMG_1431

CHICK PEAS SALAD
Garbanzo Chickpeas - 1 Can Or [1 Cup Soaked Overnight and Cooked]
Coriander Leaves - 1/2 cup
Mint Leaves - 8 to 10 leaves
Green Chili - 1 small
Lemon - 1 tsp
Oil - 1 tsp
Onion - 1/4 onion Chopped finely (Optional)
Tomato - 1/4 tomato Chopped finely(Optional)
Coconut grated - 1/4 cup (Optional)

If using canned peas, remove the peas from the can, transfer to a vessel and wash in fresh water 2 to 3 times. Set aside.

Grind together coriander, mint and green chili to a coarse paste.

In a non-stick pan, heat oil over low heat, add the paste and fry for 2 minutes. Add the chick peas and salt and fry for few minute until well coated.

Add lemon juice and adjust salt. Sprinkle with onions and tomatoes or coconut (if preferred). Serve hot!

Sending this recipe to Show me your Salad and Carnival of Salads events. Also sending this recipe to My Legume Love Affair (MLLA) Edition 21 event and Family Favorite event.
Wednesday, February 3, 2010

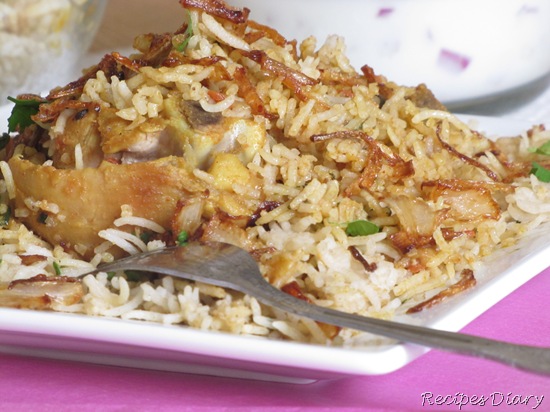
Mr.Shan Mix & Chicken Briyani

When its comes to cooking biryani..its always been a nightmare for me! Every time I end-up calling my mom to ask silly questions. How much coriander powder? how many cloves..cardamoms etc..etc.? And I always end-up adding more cloves & cinnamon, and the result, over-flavored Biryani. Poor me!

And then, there came my dear 'Mr.Mix' to the rescue. While hunting though the shelves in nearby Indian grocers, 'Mr.Mix' caught my attention and followed me home.

Typically, one can very well follow the instructions at the back of the box. But for me, nah.. I tried a different variation, a blend of South-Indian based rice, Shan-mix based gravy and final touch with the help of Oven. Touch-wood!
IMG_1268 
CHICKEN BIRYANI 

For the Rice
  • Basmati Rice - 1 cup
  • Coconut Milk - 1 cup
  • Pepper corns - 3 to 5
  • Green chili - 1(slit lengthwise)
  • Black Cumin(Shahi Jeera) - 1 tsp
  • Coriander powder - 2 tbsp
  • Oil - 2 tsp
  • Coriander Leaves - a small bunch.
  • Water - 1 cup
Soak the rice for 10-15 minutes. Take a pan, heat oil over medium heat, add cumin seeds, green chili and pepper corns, fry for a minute and add the coriander powder. Fry for a minute in low heat. Do not burn the coriander powder. Make sure enough oil is there to fry the coriander powder.

Add water and coconut milk carefully, without spilling over and mix thoroughly. Once the water starts to boil, add the rice and coriander leaves.

After adding rice, you can cook the rice in three methods.

Rice Cooker - transfer the rice & water and cook accordingly.

Pressure Cooker - transfer the rice & cook for 1 whistle or as required.

Stove Top - Cook till the water evaporates, and then close tightly with a lid and simmer till the rice is cooked.

Choose whichever method suits you better, and make sure the rice remains as individual strands after cooking. Cook the rice and set aside.

Gravy - With Mr.Mix
  • Chicken - 0.7 Pounds (Preferably thighs or drumsticks -4 to 5 pieces )
  • Onion - 2
  • Tomato -1
  • Ginger garlic paste- 1 tbsp
  • Shan or National Chicken Briyani Mix : 4 tbsp
  • Coriander powder - 1 tbsp
  • Green chili - 2
  • Cumin Seeds - 1 tsp
  • Yogurt - 2tbsp
  • Oil - 2tbsp
  • Coriander leaves - from 3 to 4 stalks
  • Mint leaves - 6 to 8
  • Fried Onion - 1/2 cup [or use 1- finely sliced onion and deep fry until golden brown]
In a thick-bottomed pan, heat the oil, splutter the cumin seeds, add green chili and ginger garlic paste and fry till the raw smell goes. Add onion and fry till brown.

Add the coriander powder and chicken masala and fry for another minute. Add the tomato and cook till done.

Add the chicken pieces, reduce to low heat, cover and cook for 20-30 minutes, until the chicken is soft and tender. Stir in the yogurt, mint and coriander leaves and fry for another minute over medium heat till the oil separates.

Arranging & Baking

Pre-heat the oven to 325F. In a baking-dish, add the gravy in the bottom layer, sprinkle with chopped coriander leaves(optional) and then layer the rice on the top. Sprinkle with fried onions, coriander leaves and butter. Tightly close with the foil and bake for about 20 minutes.

Sending this recipe to APS Rice event hosted by Anitha of Anitha's Kitchen.

Sunday, January 31, 2010

FAN-tastic Croissants

If you have ever been to coffee day, and diligently lingered on those smoky, vegetable stuffed croissants, you will understand the reason behind my post-title. Yes! The soft-sweet croissants with the spicy stuffing made me a coffee-day fanatic.

But I never took it to making them at home, not until..couple of days back. When I came across 'Crescent Samosas', yes, that's how they named it in the 'tasteofhome' magazine, it unknowingly kindled my remembrance of those tasty eat-outs. So, here I am.

IMG_1336

STUFFED CROISSANTS

Followed the same procedure as mentioned in the recipe, with an authentic-samosa stuffing. You can try using your own savory or the kids-friendly sweet stuffing. Do watch this video, if your are not familiar with rolling the crescents.

I used 1 Can(8-0z) reduced-fat crescent rolls [I used Pillsbury Crescent]. Contains 8-triangles.

Stuffing

  • Potato - 1 medium boiled and cubed
  • Onion - 1 medium finely chopped
  • Green peas frozen -1/2 cup
  • Carrot - 1/2 cup frozen(Optional)
  • Cumin Seeds - 1/2 tsp
  • Garlic - 1 clove chopped
  • Green chili -1 chopped
  • Coriander powder - 1 tsp
  • Garam Masala - 1/2 tsp
  • Amchur powder - 1/2 tsp
  • Grouded fresh pepper corns - 1/2 tsp

In a pan, saute the cumin seeds, green chili, garlic and onion in oil until lightly browned. Stir in the peas, carrot and potato. Add the coriander powder, armchur powder and pepper. Transfer to a bowl and lightly mash them Sprinkle with garam masala.

Separate the crescent dough into 8 triangles. Place 1 tablespoon of the stuffing on the wide end of each triangle; roll from the wide end and curve at the edges to form the crescent shape. Make sure to keep the pointed-end underneath when arranging on a baking sheet. Use an un-greased baking sheet.

Bake at 375° for 10-12 minutes as per the instructions on the tube or until golden brown.

 
IMG_1337
 
Sending this recipe to Rahin's Semi Homemade -Indian Recipes event and Kids delight Wholesome breakfast event.

Also sending this recipe to Think Spice - Think Amchur event hosted by Bhagya of Taste Buds, started by Sunita of Sunita's world.

Friday, January 29, 2010

Comforting Sip

If there is any food, that seems comforting and calming, its definitely a warm bowl of soup. A sip of warm, creamy, flavorful soup during the winter is heavenly, as most of us would agree.

Adapted the recipe from here. There are quite a few versions of making a lentil & carrot soup, like adding whole veggies or lentils to the soup without blending. Even the type of lentil used might give a different taste. But, I liked this one, a modified version with a hint of ginger and sourish yogurt at the finish. And hence sticking to the same!

P.S.In all the excitement, I forgot to add the turmeric! That would be the reason for my 'pale' yellowish soupy!
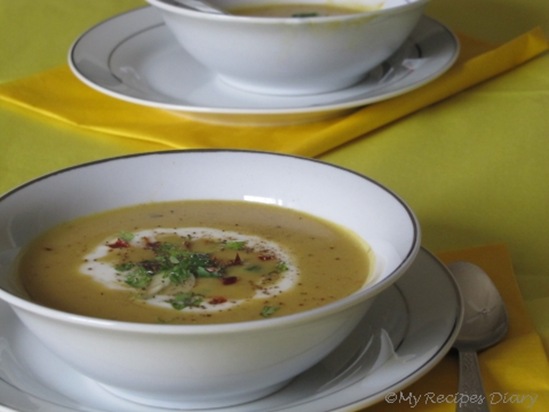
10

CARROT LENTIL SOUP

  • Ginger - small piece peeled and grated
  • Cumin seeds - 1tsp
  • Red chili flakes - 1tsp
  • 1 medium onion - finely chopped
  • 2 medium carrots - peeled and grated
  • Red lentils - 3/4 cup [Masoor Dal]
  • Fresh Vegetable stock - 2 to 3 Cups
  • Coriander leaves - 4 or 5 stalks
  • Yogurt - 3 tbsp
  • Pepper powder - freshly grounded 1 tsp
  • Oil - 2 tbsp

Dry roast the cumin seeds in pan over a medium heat and ground the cumin coarsely, using a grinder or a mortar-pestle.

Heat oil in the same pan, add the ginger pieces and onion and fry till browned. Add the vegetable stock along with the grated carrots, turmeric and lentils and cook over a medium heat, until the lentils are tender.

Stir in the grounded cumin. Switch off and let it cool. Blend smoothly in a blender. Transfer the soup to the pan and re-heat for about 3-4 minutes. Add some more vegetable stock if the soup is too thick.

Serve sprinkled with coriander leaves, red chili flakes and pepper powder and yogurt.

Sending this recipe to Usha's Healthy Inspirations event.

Tuesday, January 26, 2010

Cooking with Love-ly Greens

Upon kind request from my dear husband, I have been cooking all sorts of greens, lately. So much that, I wanted to add greens to all my dishes.

When I googled for a chicken recipe with greens, came across quite a few interesting combination, and finally settled for the one in this page. This recipe seemed very simple and also suited me. I modified a little, well, mostly the method and consistency and tossed in a few additional ingredients.

Methi and Chicken is an authentic hyderabadi recipe. The soft chicken complements the slightly bitter methi well, and the tangy tomato gravy adds an additional taste to this curry.
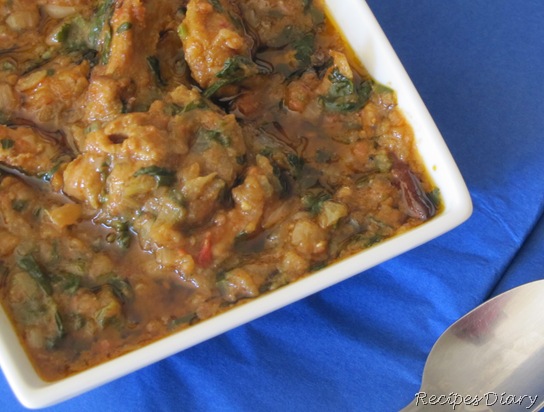
IMG_1216

METHI CHICKEN/MURGH CHICKEN

  • Onion - 2 [very finely chopped]
  • Tomato - 2 [blend to a coarse paste]
  • Fresh Methi leaves - 1 bunch
  • Ginger Garlic paste - 2tsp
  • Chicken - 0.7 lb - 1 lb.
  • Coriander powder - 1 tbsp
  • Cumin powder - 1tsp
  • Turmeric powder - 1tsp
  • Yogurt - 1 tbsp
  • Red chili powder - 3tsp or as required.
  • Cumin seeds - 1/2 tsp
  • Oil - 3tbsp
  • Coriander leaves - 4-6 stalks.

Wash and marinate the chicken with 1/2 tsp salt and turmeric powder for 10 minutes.

Take a heavy-bottomed pan, heat oil, splutter the mustard seeds, cumin seeds, cardamon, clove and curry leaves. Add the onion and fry till nice brown. Add the ginger garlic paste and fry till the raw smell goes.

Add cumin powder, coriander powder and red chili powder and fry for 1 minute. Now add the chicken pieces and toss everything to coat the chicken well. Cover and cook for 15 minutes in a low flame, till the chicken is tender.

Now add the methi leaves and cook for another 2 minutes in a medium flame uncovered, till the methi leaves starts to wilt.

Add the tomato puree along with yogurt and 1/2 cup water and bring to boil. Cook for another 10-15 minutes until the oil oozes out. Add coriander leaves and switch off.

Note: For the chicken to be tender, after thawing, transfer the chicken to a Ziploc bag. Take a big, nice pestle or any similar tool and beat the chicken on both sides, taking care not to crush the chicken or tear the bag. This helped me especially when I used frozen poultry.

Sending this recipe to the event Served with Love, organized by Gourmet Affair.

Friday, January 22, 2010

Home Cooking

Its been over a year I visited my home country, and for me apart from few other things, it means only one thing. My kitchen pantry is missing homemade masala's from my mom. By which, you are forced to making your own masala, and believe me it was worth an experience.

We often wonder why the food is so tasty and authentic at our grandparent's, its just because they use everything fresh, starting from the stone grinded coconut paste to fresh ginger garlic paste and much more.

Here is my attempt to make my curry paste at home for a 20-minute dinner! Yes! it just took me 20-minutes for making this healthy sweet potato and spinach wraps from scratch, of-course except for the pre-cooked chapathis!
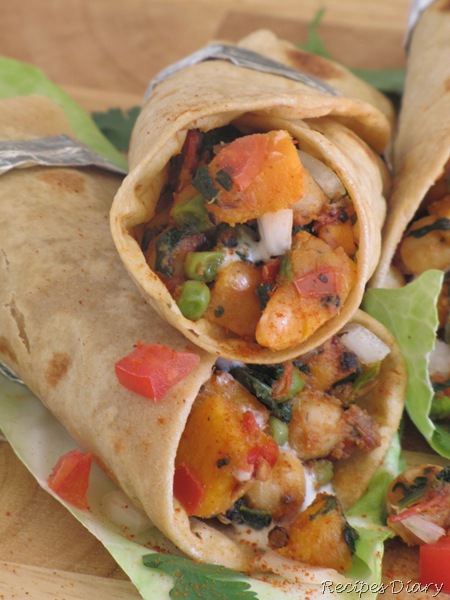
IMG_1096 
 SWEET POTATO WRAPS

  • Sweet Potato - 1 Medium sized Cooked and cubed.
  • Garbanzo(Chick Peas) - 1/2 cup Cooked or Tin.
  • Green Peas - 1/4 cup frozen
  • Tomato - 1 Small chopped [Use 2tbsp of tomato from this for the Curry Paste below]
  • Red Chili - 1[De-seed and cut the flake in to small pieces]
  • Baby Spinach - 1 cup
  • Coriander - 4-6 stalks
  • Curry paste - 2tsp(or 1tsp of coriander powder and 1tsp of garam masala).
For the Wrap,
  • Chapati - as required
  • Onion - 1/4 cup chopped finely
  • Tomato - 1/4 cup chopped finely
  • Curd - 1/4 cup beaten slightly
  • Curry Paste
  • Tomato - 2 tbsp Chopped and minched
  • Garlic - 2 cloves chopped and minched
  • Ginger - 1 inch Chopped and minched
  • Pepper corns - 1/2 tsp
  • Cumin seeds - 1/2 tsp
  • Coriander seeds -1/2 tsp
  • Red chili -1
  • Mustard Seeds - 1/2 tsp
  • Oil - 2 tbsp
Dry roast cumin seeds, pepper corns, coriander seeds, red chili and mustard seeds, cool and grind it to a fine powder.

Heat oil in a pan, add the ginger, garlic and fry for few minutes. Add the tomato and give it a toss. Add the grinded spice mix and fry for another minute. Transfer the mixture to another vessel, cool and grind the curry paste.

Note: Can make the curry paste in bulk and store it in refrigerator for up-to 1 week.

Instead, please feel free to use your own curry masala about 2tsp(or any store bought one).

For the Stuffing,

In the same pan, add 1 tsp oil, red chili flakes, tomato, chick peas and green peas and the curry paste mixture. Fry till the green peas is cooked.

Now add the cubed sweet potato and salt, toss and simmer and add the spinach and cook.

Wrapping,

Take the Chapati, spoon in as much stuffing as needed, top it with few pieces of onion, tomato, lettuce and 1tsp curd. Wrap and enjoy your bite!

Note: Can substitute curd with Ranch, or mayo if preferred. Kids would love it with ketchup. But plain curd would be more healthier option!

The recipe is on its way to Creative Food for Picky/Fussy Eaters Healthy Breakfast and Dinner event, Healthy Fast Food event and also Kids-Delight Wholesome breakfast event.

Thursday, January 21, 2010

One hot plate

My plan was to make the most common and popular street food known in every corner of Tamilnadu, the so called 'Kothu Paratha'. Unfortunately my pantry was missing the important ingredient-'the egg' to make the recipe.

But this one is yet another paratha recipe, which is a daily menu in almost all south-Indian restaurants. I used almost the same ingredients which calls for chili paratha, but varying the method of preparation. There are few different recipes for a chili paratha, which I promise to post later.

A simple recipe but a hot and spicy one, as its name suggests.

IMG_1004

CHILI PARATHA
  • Paratha - 3 [fresh or frozen]
  • Capsicum/Green Bell Pepper - 1/2 cup [cut into bigger pieces]
  • Onion - 1 [cut into bigger pieces]
  • Ginger garlic paste - 1/2 tsp
  • Red chili powder - 1tsp
  • Coriander powder - 1/2 tsp
  • Green Chili -1 chopped
  • Tomato - 1 [Mashed using a mortar pestle]
  • Cumin Seeds - 1/2 tsp (Optional)
  • Oil - 3tbsp
Take an iron skillet and heat 3-tbsp oil over medium-high heat. Once hot, splutter the cumin seeds. Add onion, green chili and fry till brown. Add ginger-garlic paste and fry till the raw smell goes.

Now add the bell peppers and cook till tender. After the bell peppers are cooked, if you see oil floating in the pan then drain out the extra oil.

Add the coriander powder and red chili powder and fry for another minute. Now add the mashed tomato and salt, simmer and keep frying till the tomato is cooked.

Add in the paratha pieces and stir well. Once everything is mixed, transfer to a wide hot iron griddle or tava, and spread out the paratha mixture. Cook over medium heat, slowly turning them, without spilling out. Make sure, the paratha's are slightly browned and crisp.

P.S. The last step is very important, which gives a final touch and a smoky flavor to the dish.

The recipe is on its way to to the Healthy Fast food event organized by Radhika of Food for 7 stages of life.

Saturday, January 16, 2010

Comfort Snack

Until few months ago, the cutlets I have tasted, or as a matter of fact, the ones I made, be it vegetable or meat, its always just been a combination of potato, bread and the cooked vegetables combined all together and deep fried.

But, a couple of months ago, I happened to taste seasoned meat stuffed inside potato shells at my friends. Its was so delicious, and the taste that lasted in my tongue took me here. Mostly followed the usual cutlet recipe, with just a traditional vegetable stuffing.

P.S. Don't be deceived by the ingredients and steps, its was quite simple and easy to make.
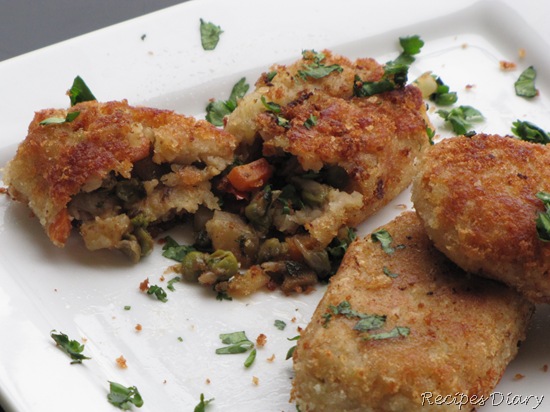
IMG_0685 
STUFFED POTATO CUTLETS

For the shells

  • Potato - 1 large [Boiled and Peeled]
  • Bread - 4 firm slices
  • Vegetable Oil - 1 tsp
  • Salt - 1tsp or as required
  • Pepper or Red chili powder - 1tsp(Optional)

IMG_0579Let the potato sit on the counter top, and let it cool down. Mash the potatoes in a large bowl with hand or a potato masher.

Soak the bread in warm water, squeeze out the water keeping the bread between your palm, and add it to the mashed potatoes.

Add salt and knead the dough well.

If the dough looks to sticky, add few dry bread slices and knead well.

Brush with oil and set aside and proceed with the rest of the ingredients.

For the filling
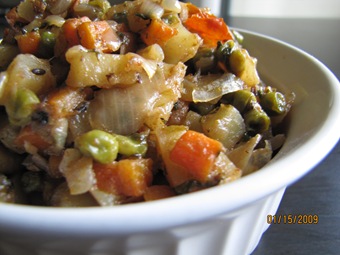
  • Vegetable Oil - 1 tsp
  • Cumin seeds - 1tsp
  • Red Chili -1 (or) Green Chili -1
  • Onion - 1/2 chopped finely
  • Ginger root - 1 tsp chopped
  • Garlic - 2 cloves chopped
  • Potatoes - 1 medium [peeled and cut in to 1/4 inch or smaller cubes]
  • Carrot - 1 medium [peeled and cut in to 1/4 inch or smaller cubes]
  • Frozen peas - 1/4 cup boiled
  • Cilantro - 1/4 cup chopped
  • Amchur powder - 1 tbsp
  • Red chili powder - 1 tsp
  • Ground Pepper - 1 tsp [freshly ground]
  • Curry leaves - 2 or 3
  • Water - 2tbsp or as required to cook the vegetables.

IMG_0623Heat Oil, splutter the cumin seeds and red chili or green chili.

Add ginger, garlic and curry leaves and fry for few minutes.

Add Onion and fry till slightly brown. Now add all the ingredients fry for 2 minutes.

Add water, simmer, cover and cook for 10-15 minutes till tender.

Once the water has been absorbed, or evaporated, fry for another 1 minute or so, till the filling looks absolutely dry and well fried.

For the Coating

  • Egg White or Whole egg - 1 slightly beaten
  • Bread crumbs - 1/2 cup or as required
  • Oil for Shallow frying - 4-6 tbsp

Making the Cutlets

Apply few drops of oil in your palm, Take a small portion of the dough, and flatten out with your palms, or roll using a rolling pin.After rolling, spoon in the filling.

Fold the dough, from one side and seal the edges. Dip it in the beaten egg and cover with the bread crumbs.

Shallow fry the cutlets in a wide pan with 4 tbsp of vegetable oil and dry in a paper towel. Serve with mint or coriander chutney.

Sending this recipe to Think Spice - Think Amchur event hosted by Bhagya of Taste Buds, started by Sunita of Sunita's world.
Wednesday, January 13, 2010

Cooking with a Wise Seed

Recently, I have been to many holiday potlucks and dinner treats, served with lots of fabulous and authentic home-cooked foods. The most interesting thing I noted was, though there were great restaurant style recipes and beautiful foods, the ones that attracted the guests were well-styled and foods decorated with innovative and new ideas.

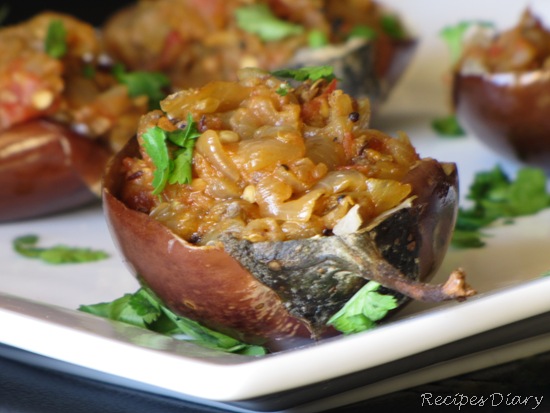
The experience inspired me to style and garnish my food, rather than to serve a delicious food..which looks normal otherwise. And here is my humble attempt in providing a better presentation.

A word about this wise seed, 

Sesame seeds are very nutritious and gives a unique taste when added to certain vegetables and snacks. In Hindu beliefs, these seeds are considered to represent the symbol of immortality, and ancient Ancient Babylon women were said to intake a spoon of sesame seeds soaked in honey daily, to prolong youth and beauty..In recent times, these seeds are enormously used in Ayurveda medicines.... read more from here.
 
IMG_0389
 
EGGPLANT/BRINJAL MASALA
  • Medium sized Brinjals/EggPlants - 6 [The ones available in Indian Grocers]
  • Tomato - 1 chopped
  • Onion - 2 chopped
  • White sesame seeds - 1tsp
  • Coriander seeds - 1/2 tsp
  • Mustard seeds - 1/2 tsp
  • Cumin seeds - 1/2 tsp
  • Oil - 2 tbsp
  • Ginger - 1/2 tsp finely chopped
  • Garlic - 1/2 tsp finely chopped
  • Dried Red chili -1 or 2
  • Red chili powder - 1 tsp
  • Coriander powder -1 tsp
  • Curry leaves - 4 or 5
  • Coriander leaves for garnishing
  • Salt to taste
Cut the eggplants into two halves lengthwise.Preheat the Oven to 400F. Place the brinjal in a roasting pan, with the cut sides facing upward. Add about 1/2 cup of water and close the pan tightly with a lid or foil and bake for about 20-30 minutes.

Meanwhile, in a pan heat oil over medium heat, splutter mustard seeds and then add garlic, ginger, red chili, crushed coriander seeds, crushed sesame seeds, cumin seeds and fry till the seeds are lightly brown and the raw smell goes away.

Add the onion and fry till brown. Add the coriander powder and red chili powder and fry for another minute and add the tomatoes and cook till tender.

Remove the eggplant flesh carefully with a spoon and add it to the spice mix. Cook on low heat for 4-5 minutes, until oil separates.

Wipe off the water from the egg plant skins and place them in baking tray lined with foil, sprinkle with little oil, and bake for 10 minutes.

Once done, cool and spoon in the masala. Garnish with coriander leaves and serve.

The recipe is on its way to Cooking with Sesame seeds, event hosted by Priya of Priya's Easy and Tasty Recipes. Also, sending this recipe to Vegetable Marathon event hosted by Anita of Anita's Kitchen.

Tuesday, January 12, 2010

Something Silky-Palak Paneer

Homemade cheese/paneer in spinach and tomato gravy. Came across lots of different recipes from many wonderful blogs and food websites. I tried two to three times with little bit variations and finally arrived at a perfect taste to suit me. Mostly, the restaurant style accounts for cashew-nut powder and little milk, which makes the dish more silky, but i tried without those two, and it did tasted well.
 
IMG_0289
 
PALAK PANEER
  • Spinach - 1 bunch fresh or frozen
  • Paneer - 10-15 cubes
  • Tomato - 1 medium
  • Green chili - 1
  • Mustard seeds - 1/2 tsp
  • Cumin seeds - 1 tsp
  • Turmeric Powder - 1/2 tsp
  • Oil-2tbsp
  • Coriander powder - 1 tbsp
  • Garlic cloves -2
  • Ginger Garlic paste - 1 tsp
  • Garam Masala - a pinch
  • Roasted cashew-nut powder - 2 tsp (Optional).
 
Take a pan, add oil, splutter 1/2 tsp cumin seeds, add the whole garlic and green chili. Fry for half a minute. Now add the spinach and cook till tender. Once done, switch off, transfer to a blender and give two or three pulse. Do not grind it to smooth. Set aside.

Drop the tomato in a boiling water. Once the skin is cooked, remove and discard the skin. Grind the tomato along with the coriander leaves and set aside.

Now heat oil in a pan, and shallow fry the paneer cubes, to make it slightly brown on the outer surface. Soak the fried paneer in 1/2 cup warm water to keep it soft and set aside.

Now, use the same pan with oil, splutter the mustard seeds, add onion and fry till tender. Add the ginger garlic paste and fry till the raw smell goes.

Now add the coriander powder, red chili powder, turmeric powder and salt. Fry for 1 minute.

Add the spinach paste and let it simmer for 3-4 minutes. Add the tomato paste along with 1/4 cup of water and cook for 3-4 minutes in medium heat and bring to a smooth consistency. If preferred, you can add cashew-nut powder now along with the paneer cubes and cook for another 1 minute string.

Adjust salt switch off. Sprinkle with garam masala.

Sending this recipe to Healing food event-Spinach  event.

Monday, January 11, 2010

The Taste Comes in Small Bottles

This wonderful bottle gourd curry which is more like a soup, is also a very good combination with rice. Goes well with chapatis and pooris too! Though this dish accounts only for the flesh of the bottle gourd, the skin can also be used for making chutneys, which I will post later.

Gourds are specially know for their moisture content. Bottle gourd is know to be used in simple home treatments for urinary disorders, excessive thirst and even diabetics people consume more of gourds for healthy weight maintenance.  For more details about bottle gourds, read here.
 
IMG_0363
 
BOTTLE GOURD CURRY
  • 1/2 medium sized Bottle Gourd (Peeled and cut into 1/4 inch cubes).
  • Onion-1 finely chopped
  • Mustard Seeds - 1tsp
  • Cumin Seeds - 1/2 tsp
  • Turmeric Powder - 1/2 tsp
  • Red Chili Powder - 1 tsp
  • Coriander Powder - 2 tsp
  • Fresh Ground Pepper - 1tsp
  • 1/2 cup water
  • Coriander leaves for garnishing
  • Coconut milk -1/2 cup(Optional)
Heat oil in a pan, splutter the mustard seeds and cumin seeds. Add Onion and fry till brown.

Now add turmeric powder, red chili powder, coriander powder, ground pepper powder and fry for 1 minute.

Reduce to low-medium heat and add the vegetable and salt.Stir to mix well. Close with a lid and let the vegetable cook for 2-3 minutes.

Once the vegetable is almost cooked, add 1/2 cup water and bring it to boil. Switch off.

Note: If you want the gravy to be thick, add 1/2 cup of coconut milk just before switching off. Adjust salt and red chili powder.

Sending this recipe to Anna’s Cool Finds(Weekend Herb Blogging#217) event as listed in Haalo's.